Difference between revisions of "StationReturn Index"
(Created page with "__TOC__ <h1>Placing an RMA order (Return Merchandise Authorization)</h1> When your station is required to return stock back to a warehouse, or to another catering station yo...") |
(Updated to use Tips and tricks template, fixed some grammatical errors, removed excess whitespace, and changed HTML header tags to wikitext headers) |
||
| (2 intermediate revisions by one other user not shown) | |||
| Line 1: | Line 1: | ||
| + | {{Tips and tricks}} | ||
| + | |||
__TOC__ | __TOC__ | ||
| − | + | =Placing an RMA order (Return Merchandise Authorization)= | |
| − | |||
When your station is required to return stock back to a warehouse, or to another catering station you will be required to create a manual RMA (Return Merchandise Authorization). In the same process as Requisitions, RMAs will also go through an approval process by SkylogistiX to verify if the return of stock is required and genuine. | When your station is required to return stock back to a warehouse, or to another catering station you will be required to create a manual RMA (Return Merchandise Authorization). In the same process as Requisitions, RMAs will also go through an approval process by SkylogistiX to verify if the return of stock is required and genuine. | ||
| − | To place | + | To place an RMA order you will need to navigate to “Daily Activities”, “Station Returns”, “Create / Review” from the toolbar. |
| − | |||
| − | |||
| + | [[File:rma_1.png|400px]] | ||
This will show the following screen; | This will show the following screen; | ||
| − | [[File:rma_2.png]] | + | [[File:rma_2.png|800px]] |
| − | |||
| − | |||
| − | |||
| + | ==Creating a new RMA== | ||
To now create your RMA to return stock to a warehouse or station you will need to click the new record button; | To now create your RMA to return stock to a warehouse or station you will need to click the new record button; | ||
[[File:rma_3.png]] | [[File:rma_3.png]] | ||
| − | |||
You will then select your relevant station; | You will then select your relevant station; | ||
| − | [[File:rma_4.png]] | + | [[File:rma_4.png|600px]] |
| − | |||
| − | |||
| − | |||
| − | + | By doing so the following screen will be presented in which you can add required details such as destination type, location, dates, tracking numbers, and items along with their relevant quantities. | |
| + | [[File:rma_5.png|800px]] | ||
| − | In the “Destination Type” drop down you can select whether you will be sending your stock to a warehouse or another station. If ‘Warehouse’ is selected, then you can choose a warehouse | + | In the “Destination Type” drop-down you can select whether you will be sending your stock to a warehouse or another station. If ‘Warehouse’ is selected, then you can choose a warehouse that has a valid transport link set up in the system for your station, you can then select the relevant ‘Transport Mode’ you will send the stock. If, however you are sending the stock to another station then ‘Station’ should be selected in “Destination Type”, this will not give you the choice to select a transport mode though. |
Now a “Desired Despatch Date” can be selected, which should be accurate to the day you will physically send the stock. You can also add a “Transport Ref (AWB/BOL)” if you have been provided one from your transport provider. Note: (AWB = Air Way Bill / BOL = Bill of Lading). | Now a “Desired Despatch Date” can be selected, which should be accurate to the day you will physically send the stock. You can also add a “Transport Ref (AWB/BOL)” if you have been provided one from your transport provider. Note: (AWB = Air Way Bill / BOL = Bill of Lading). | ||
| Line 39: | Line 34: | ||
Once the above fields are filled out it should look like the below; | Once the above fields are filled out it should look like the below; | ||
| − | [[File:rma_6.png]] | + | [[File:rma_6.png|800px]] |
| + | You can now start adding items by selecting the add button on the line level, you can then click “Select Stock Item” which will detail all the items set up for your station, although you can only return the same or less than the last counted quantity of an item (this is detailed with the “Max Return Quantity” column). | ||
| − | + | [[File:rma_7.png|700px]] | |
| − | + | Once you have selected your item you can add the quantity you are returning and click “Save”, this will return you back to the header screen for the RMA you are raising where you can add more items or if all details are filled out, click “Submit”. | |
| + | [[File:rma_8.png|800px]] | ||
| − | Once you have | + | Once you have submitted your RMA you will have to wait until it is approved, you will receive an email alert once that has been done which will then enable you to despatch the stock (detailed in 9.2) |
| − | + | ==Despatching an RMA== | |
| + | As detailed in the above section once your RMA has been approved by SkylogistiX you can then despatch it, you will see in the main “Create/ Review Station Return” screen that your RMA will be in status ‘Awaiting Despatch Confirmation’. | ||
| + | [[File:rma_9.png|800px]] | ||
| − | + | Click the edit pencil button for the relevant RMA to then enter a “Despatch Date” and “Expected Date”. You will also need to add a “Ship Confirmed Quantity” for each line of the RMA, this is because since you submitted the RMA and it was approved stock levels may have changed and you need to now return less. | |
| + | Also if when you initially submitted the RMA (detailed in the section above), you didn’t include a transport reference you can add one in this screen or alter the one you originally provided in “Transport Ref (AWB/BOL)” | ||
| − | + | [[File:rma_10.png|800px]] | |
| − | + | Once all details are added you can now click “Submit” or “Abort Return” if you no longer require the RMA at all. | |
| − | |||
| − | |||
| + | ==Generating proforma invoice== | ||
| + | The proforma invoice contains details required for the export and import clearance of the consignment. To generate the document, the RMA should be on status awaiting receipt. Click on the view or edit option on the RMA you want to generate the proforma invoice for, and the option Generate Pro Forma Document will be displayed at the bottom of the page. | ||
| − | + | [[File:20210118_RMA_generate_proforma.png|250px]] | |
| − | + | After you click, a message will be displayed, click close and refresh the page. | |
| − | [[File: | + | [[File:20210118_RMA_PDF_request.png|450px]] |
| + | A new icon will appear next to Generate Pro Forma document, click on it to download the document. | ||
| − | + | [[File:20210118_Download_proforma.png|280px]] | |
Latest revision as of 18:26, 8 September 2021
Please use our Tips and Tricks page for understanding how the SkySuite portal works and how to navigate faster and easier.
Contents
Placing an RMA order (Return Merchandise Authorization)
When your station is required to return stock back to a warehouse, or to another catering station you will be required to create a manual RMA (Return Merchandise Authorization). In the same process as Requisitions, RMAs will also go through an approval process by SkylogistiX to verify if the return of stock is required and genuine.
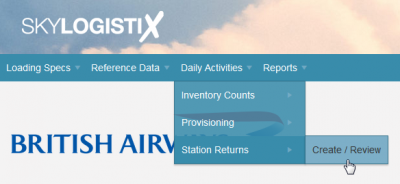
To place an RMA order you will need to navigate to “Daily Activities”, “Station Returns”, “Create / Review” from the toolbar.
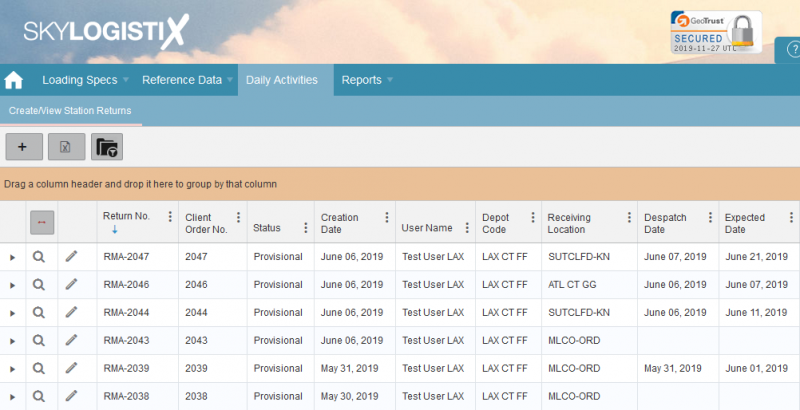
This will show the following screen;
Creating a new RMA
To now create your RMA to return stock to a warehouse or station you will need to click the new record button;
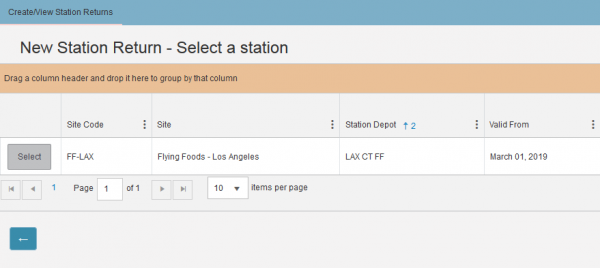
You will then select your relevant station;
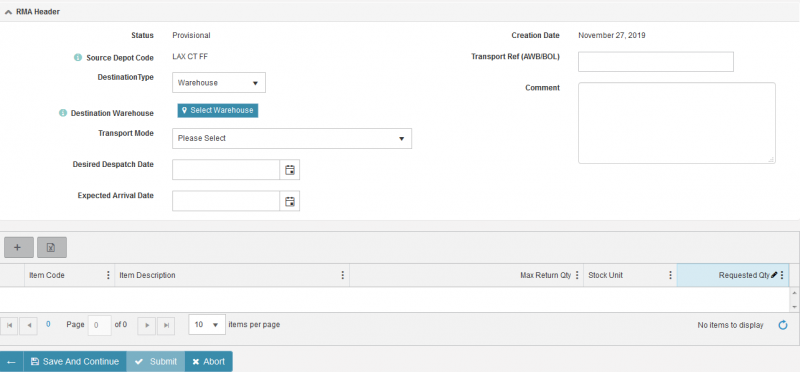
By doing so the following screen will be presented in which you can add required details such as destination type, location, dates, tracking numbers, and items along with their relevant quantities.
In the “Destination Type” drop-down you can select whether you will be sending your stock to a warehouse or another station. If ‘Warehouse’ is selected, then you can choose a warehouse that has a valid transport link set up in the system for your station, you can then select the relevant ‘Transport Mode’ you will send the stock. If, however you are sending the stock to another station then ‘Station’ should be selected in “Destination Type”, this will not give you the choice to select a transport mode though.
Now a “Desired Despatch Date” can be selected, which should be accurate to the day you will physically send the stock. You can also add a “Transport Ref (AWB/BOL)” if you have been provided one from your transport provider. Note: (AWB = Air Way Bill / BOL = Bill of Lading).
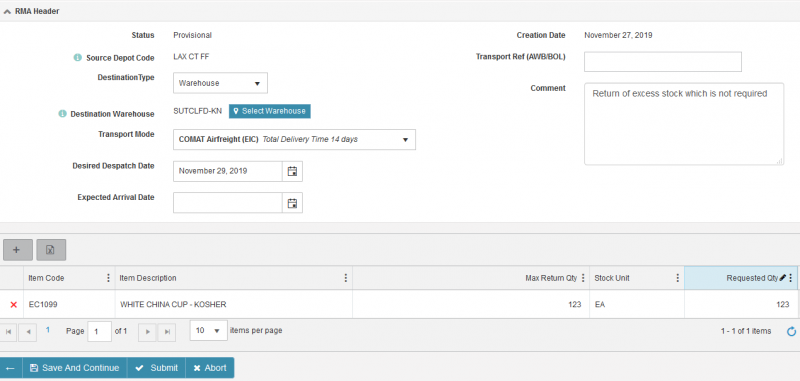
It is always a good idea to add a “Comment” too so the approver of the RMA understands the reason behind why you are returning stock. Once the above fields are filled out it should look like the below;
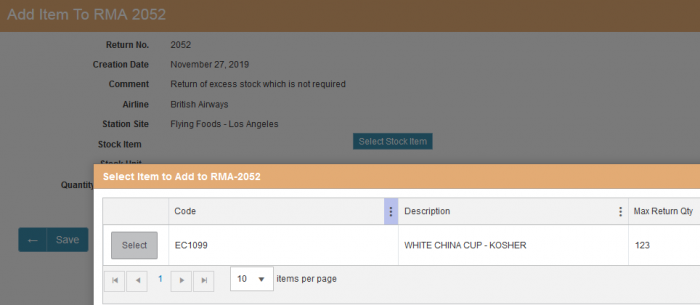
You can now start adding items by selecting the add button on the line level, you can then click “Select Stock Item” which will detail all the items set up for your station, although you can only return the same or less than the last counted quantity of an item (this is detailed with the “Max Return Quantity” column).
Once you have selected your item you can add the quantity you are returning and click “Save”, this will return you back to the header screen for the RMA you are raising where you can add more items or if all details are filled out, click “Submit”.
Once you have submitted your RMA you will have to wait until it is approved, you will receive an email alert once that has been done which will then enable you to despatch the stock (detailed in 9.2)
Despatching an RMA
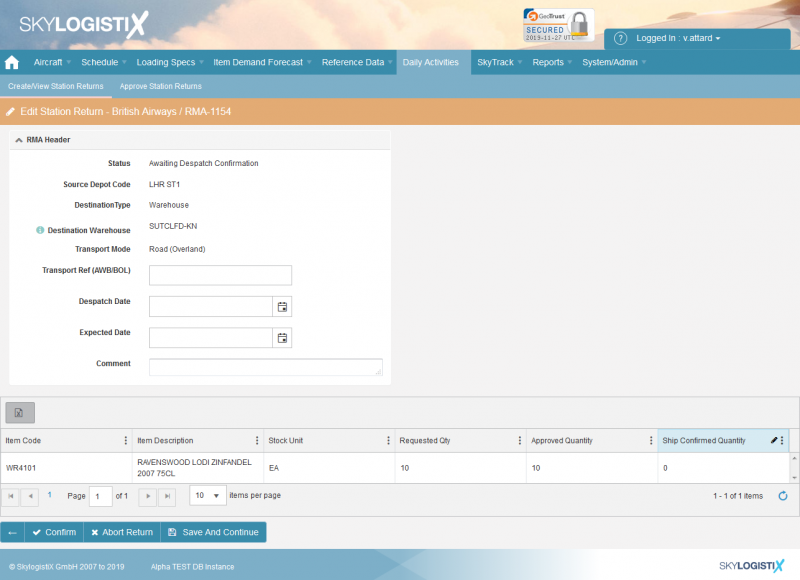
As detailed in the above section once your RMA has been approved by SkylogistiX you can then despatch it, you will see in the main “Create/ Review Station Return” screen that your RMA will be in status ‘Awaiting Despatch Confirmation’.
Click the edit pencil button for the relevant RMA to then enter a “Despatch Date” and “Expected Date”. You will also need to add a “Ship Confirmed Quantity” for each line of the RMA, this is because since you submitted the RMA and it was approved stock levels may have changed and you need to now return less.
Also if when you initially submitted the RMA (detailed in the section above), you didn’t include a transport reference you can add one in this screen or alter the one you originally provided in “Transport Ref (AWB/BOL)”
Once all details are added you can now click “Submit” or “Abort Return” if you no longer require the RMA at all.
Generating proforma invoice
The proforma invoice contains details required for the export and import clearance of the consignment. To generate the document, the RMA should be on status awaiting receipt. Click on the view or edit option on the RMA you want to generate the proforma invoice for, and the option Generate Pro Forma Document will be displayed at the bottom of the page.
After you click, a message will be displayed, click close and refresh the page.
A new icon will appear next to Generate Pro Forma document, click on it to download the document.
