Difference between revisions of "SupplierCount Index"
(Created page with "Please use our http://wiki.skylogportal.com/index.php?title=Tips_and_Tricks '''Tips and Tricks''' page for understanding how the SkySuite portal works and how to navigate...") |
|||
| Line 5: | Line 5: | ||
<h1>Supplier Inventory Counts</h1> | <h1>Supplier Inventory Counts</h1> | ||
| − | It contains the list of inventory counts already submitted (status complete), and due (status pending). In case the count is not submitted before the next count is generated in the system, the count will be cancelled automatically. To report your stock levels, the due inventory counts will be in status pending, press on the edit option [[File:20200527 Edit.png|35px]] | + | It contains the list of inventory counts already submitted (status complete), and due (status pending). The counts are listed with the most recent at the top, in the example above the top line show a count at “Pending” status which means it has not taken place yet but is expected to happen on the 7th of November (The expected date). Below this line you see all the previous counts will have all been completed or cancelled in the past. In case the count is not submitted before the next count is generated in the system, the count will be cancelled automatically. |
| + | |||
| + | You can view the detail of a report by pressing the Show Icon on the line you want to view. | ||
| + | |||
| + | [[File:Count_2.png]] | ||
| + | |||
| + | To report your stock levels, the due inventory counts will be in status pending, press on the edit option [[File:20200527 Edit.png|35px]] | ||
[[File:20210728 Supplier stock count.png|796px]] | [[File:20210728 Supplier stock count.png|796px]] | ||
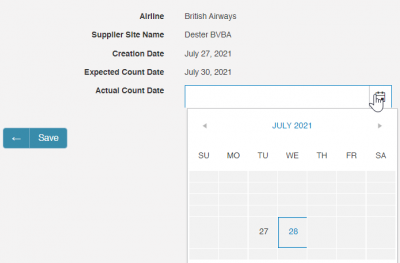
| − | + | In this screen you are required to enter the “Actual Count Date” in which the inventory count took place | |
[[File:20210728 Suppliercount setdate.png|400px]] | [[File:20210728 Suppliercount setdate.png|400px]] | ||
| + | |||
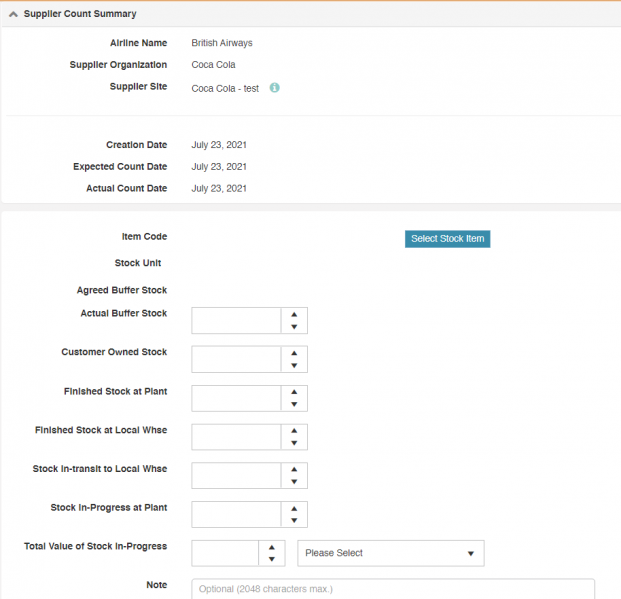
| + | Once you click “Save” you will be presented the page to enter the amount of stock you have counted against each item setup for your station, where you will be able to submit your count by entering the data directly in the portal or uploading from an Excel file upon configuration, if your location is setup for uploading the count details via an excel update you will be sent an email with it attached when the count is created. | ||
| + | |||
| + | |||
| + | The detail section will always display in pages of 10 at a time, you can move backwards and forwards through the pages with the arrow keys. You can also display everything on one screen by changing the drop down for “10” to “All” or select a certain number between 10 and 100 as well. | ||
| + | |||
| + | At the bottom of the page you will see the following buttons; | ||
| + | |||
| + | |||
| + | [[File:Count_9.png]] | ||
| + | |||
| + | |||
| + | • '''Upload Completed Count Sheet''' – If the supplier is setup to accept population of the count via an excel upload this will be presented to you, please follow the steps when clicked on uploading the completed document. | ||
| + | |||
| + | • '''View Uploaded File Errors''' – Again only visible for suppliers that upload counts via excel, this will detail any errors once you have attempted an upload. | ||
| + | |||
| + | • '''Save and Continue''' - Allows you to save what you have entered but will leave you in the screen. | ||
| + | |||
| + | • '''Save and Exit''' – Saves anything you have entered but will exit the page and return you to the main “Inventory Count” page. | ||
| + | |||
| + | • '''Submit''' - Will save your work and mark the count as complete and change the status to “Complete” after this you will no longer be able to change any of the figures. | ||
| + | |||
| + | |||
| + | <h2>Adding an Item to a Count</h2> | ||
| + | |||
| + | |||
| + | The list of items shown on the count detail page should include all the items you are expected to have at your location. If, however you have an item that is not showing you can add it with the add item button at the top of the page, provided there is a link between item an supplier. If the item does not appear on the list, please report to the Material Controller. | ||
| + | |||
| + | [[File:Count_10.png]] | ||
| + | |||
| + | |||
| + | This will display the following; | ||
| + | |||
| + | [[File:20210728 Additem Suppliercount.png|621px]] | ||
| + | |||
| + | |||
| + | Press the “Select Stock Item” button to search and choose the item you want to add. (Use the three dots under “Code” or “Description” to filter for a specific item) then click “Select”. | ||
| + | |||
| + | [[File:Count_12.png|700px]] | ||
| + | |||
| + | |||
| + | Once the item is added you can then fill in the “Float” and “Backup” quantities. | ||
| + | |||
| + | |||
| + | <h2>Submitting a Count</h2> | ||
| + | |||
| + | <h3><u>Submitting via the portal</u></h3> | ||
| + | |||
| + | As mentioned previously to submit a count to Skylogistix for review you simply press the Submit button at the bottom of the page, once you have entered quantities for all items. Until you do this the count is '''NOT''' marked as complete, and doesn’t move to the next stage thus you will continue to get email reminders that your count is overdue. | ||
| + | |||
| + | If you haven’t entered a figure for every item, you will see the message shown below and the count will not be submitted. You will then need to enter the missing figures and click submit again. | ||
| + | |||
| + | [[File:Count_13.png]] | ||
| + | |||
| + | |||
| + | Once you have successfully submitted the count you will be returned to the main page that lists all your counts and you should see that the count is now marked as “Complete”, You will now no longer be able to edit the count and you should receive an email confirming that the count has been submitted. | ||
| + | |||
| + | After a while the status will also change to “Under Review” and you will receive an email telling you that the count has been submitted successfully, which means SkylogistiX is reviewing the figures you entered. | ||
| + | |||
| + | |||
| + | |||
| + | <h3><u>Submitting via a count sheet</u></h3> | ||
| + | |||
| + | If decide to upload a count sheet instead of manually entering quantities you '''<u>MUST</u>''' download a copy from the actual count date page, or from the bottom bar of the count, as each excel document is unique to each count thus cannot be used on other counts. | ||
| + | |||
| + | You will be presented with the below sheet once you open the excel document, this is all the items associated with your station, and each line requires a quantity to be entered; | ||
| + | |||
| + | [[File:Stock_Count_Excel_1.PNG]] | ||
| + | |||
| + | |||
| + | There is also two other sheets in the document, 'User' and 'Item Reference' | ||
| + | |||
| + | [[File:Stock_Count_Excel_4.PNG]] | ||
| + | |||
| + | |||
| + | The 'User' sheet is to enter items not referenced on the main sheet, i.e. items that have been incorrectly sent to your location which you do not use but still need to recorded, simply enter the code and quantities. | ||
| + | |||
| + | [[File:Stock_Count_Excel_2.PNG]] | ||
| + | |||
| + | |||
| + | 'Item Reference' sheet is just all the items the airline you are counting for has setup in the SkyLog system for you to locate item codes if required for the 'User' sheet. | ||
| + | |||
| + | |||
| + | Once the count document is completely filled out you can then upload it into the specific count you downloaded it from, in the 'Inventory Counts' page, click the pencil icon and select 'Upload Completed Count Sheet' where you can then select the document from your PC. | ||
| + | |||
| + | [[File:Stock_Count_Excel_5.PNG]] | ||
| + | |||
| + | |||
| + | Once uploaded all quantities will be listed against the items in the SkyLog screen, if they are not then you need to click 'View Uploaded File Errors' button at the bottom the count screen to idenify the issues with the sheet, fix and reupload. | ||
Latest revision as of 17:15, 28 July 2021
Please use our [Tips and Tricks] page for understanding how the SkySuite portal works and how to navigate faster and easier.
Contents
Supplier Inventory Counts
It contains the list of inventory counts already submitted (status complete), and due (status pending). The counts are listed with the most recent at the top, in the example above the top line show a count at “Pending” status which means it has not taken place yet but is expected to happen on the 7th of November (The expected date). Below this line you see all the previous counts will have all been completed or cancelled in the past. In case the count is not submitted before the next count is generated in the system, the count will be cancelled automatically.
You can view the detail of a report by pressing the Show Icon on the line you want to view.
To report your stock levels, the due inventory counts will be in status pending, press on the edit option ![]()
In this screen you are required to enter the “Actual Count Date” in which the inventory count took place
Once you click “Save” you will be presented the page to enter the amount of stock you have counted against each item setup for your station, where you will be able to submit your count by entering the data directly in the portal or uploading from an Excel file upon configuration, if your location is setup for uploading the count details via an excel update you will be sent an email with it attached when the count is created.
The detail section will always display in pages of 10 at a time, you can move backwards and forwards through the pages with the arrow keys. You can also display everything on one screen by changing the drop down for “10” to “All” or select a certain number between 10 and 100 as well.
At the bottom of the page you will see the following buttons;
• Upload Completed Count Sheet – If the supplier is setup to accept population of the count via an excel upload this will be presented to you, please follow the steps when clicked on uploading the completed document.
• View Uploaded File Errors – Again only visible for suppliers that upload counts via excel, this will detail any errors once you have attempted an upload.
• Save and Continue - Allows you to save what you have entered but will leave you in the screen.
• Save and Exit – Saves anything you have entered but will exit the page and return you to the main “Inventory Count” page.
• Submit - Will save your work and mark the count as complete and change the status to “Complete” after this you will no longer be able to change any of the figures.
Adding an Item to a Count
The list of items shown on the count detail page should include all the items you are expected to have at your location. If, however you have an item that is not showing you can add it with the add item button at the top of the page, provided there is a link between item an supplier. If the item does not appear on the list, please report to the Material Controller.
This will display the following;
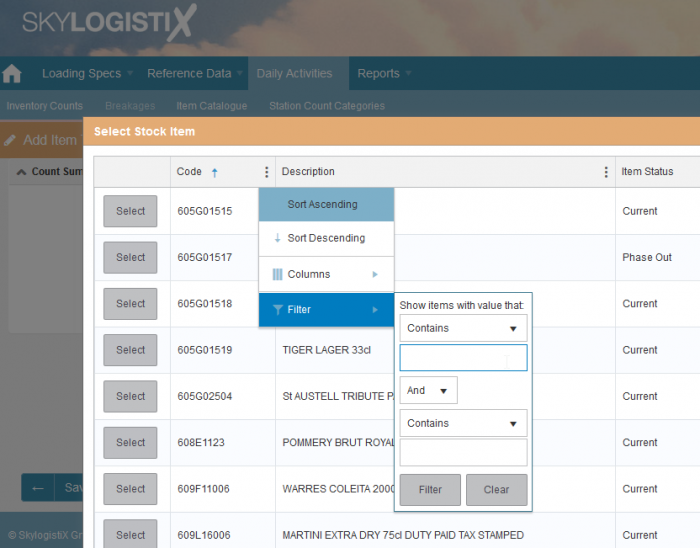
Press the “Select Stock Item” button to search and choose the item you want to add. (Use the three dots under “Code” or “Description” to filter for a specific item) then click “Select”.
Once the item is added you can then fill in the “Float” and “Backup” quantities.
Submitting a Count
Submitting via the portal
As mentioned previously to submit a count to Skylogistix for review you simply press the Submit button at the bottom of the page, once you have entered quantities for all items. Until you do this the count is NOT marked as complete, and doesn’t move to the next stage thus you will continue to get email reminders that your count is overdue.
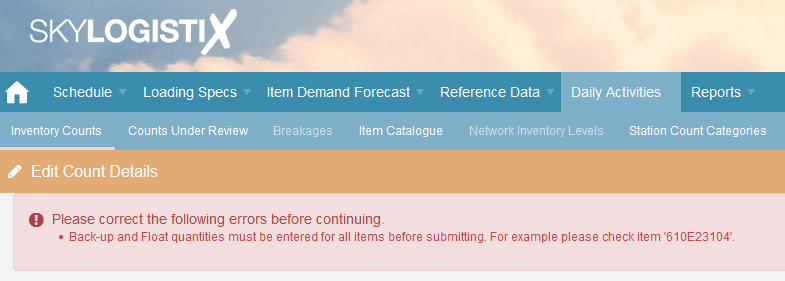
If you haven’t entered a figure for every item, you will see the message shown below and the count will not be submitted. You will then need to enter the missing figures and click submit again.
Once you have successfully submitted the count you will be returned to the main page that lists all your counts and you should see that the count is now marked as “Complete”, You will now no longer be able to edit the count and you should receive an email confirming that the count has been submitted.
After a while the status will also change to “Under Review” and you will receive an email telling you that the count has been submitted successfully, which means SkylogistiX is reviewing the figures you entered.
Submitting via a count sheet
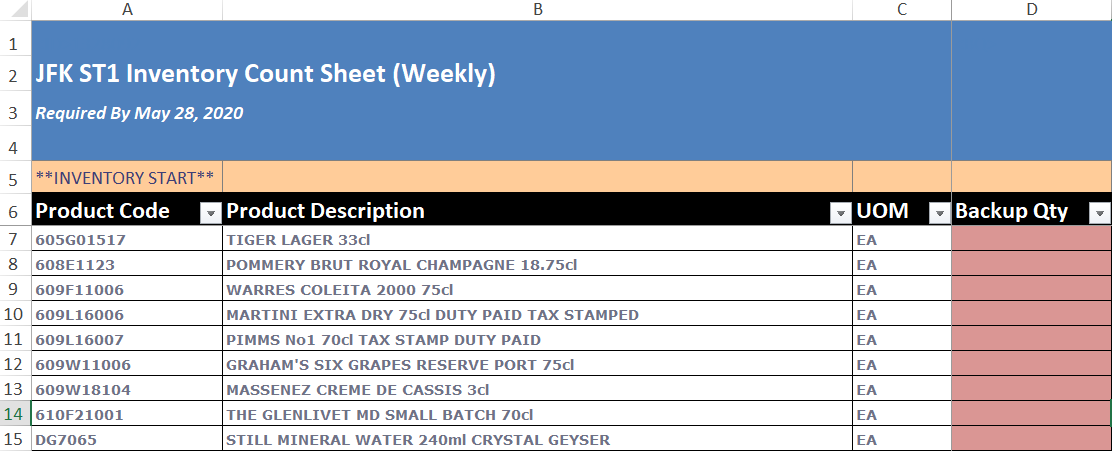
If decide to upload a count sheet instead of manually entering quantities you MUST download a copy from the actual count date page, or from the bottom bar of the count, as each excel document is unique to each count thus cannot be used on other counts.
You will be presented with the below sheet once you open the excel document, this is all the items associated with your station, and each line requires a quantity to be entered;
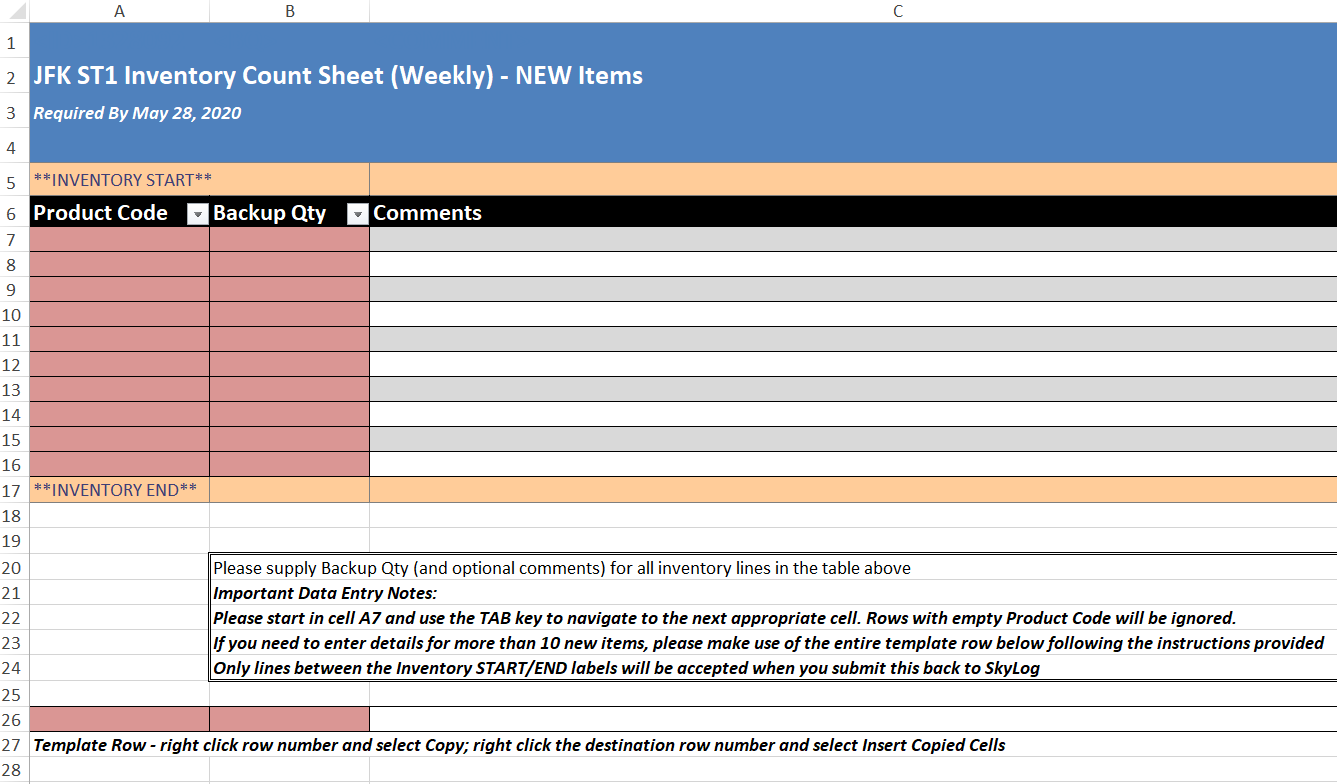
There is also two other sheets in the document, 'User' and 'Item Reference'
The 'User' sheet is to enter items not referenced on the main sheet, i.e. items that have been incorrectly sent to your location which you do not use but still need to recorded, simply enter the code and quantities.
'Item Reference' sheet is just all the items the airline you are counting for has setup in the SkyLog system for you to locate item codes if required for the 'User' sheet.
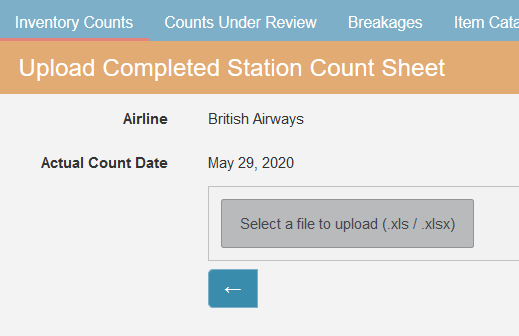
Once the count document is completely filled out you can then upload it into the specific count you downloaded it from, in the 'Inventory Counts' page, click the pencil icon and select 'Upload Completed Count Sheet' where you can then select the document from your PC.
Once uploaded all quantities will be listed against the items in the SkyLog screen, if they are not then you need to click 'View Uploaded File Errors' button at the bottom the count screen to idenify the issues with the sheet, fix and reupload.

